Remeber the N64’s Broken Joystick? Now There’s a Fix!

If a person played the N64 back in the day, chances are they logged about a billion hours between Goldeneye and Mario Kart. I was finishing up high school just as the N64 was taking off, and my buddies and I were no exception to the Nintendo 64 craze. Heck, given the number of hours in which we brutalized each other with banana peels and proximity mines, you could argue that we actually loved the N64 to death: literally.

The Flaw

The N64 was a fantastic system; however, it had one fatal flaw: the controller. Specifically, the first-party controllers that Nintendo supplied had the wimpiest joystick on the market. As a person used the joystick, the axis inside would literally wear away. The more it wore, the harder you had to push the joystick, which, in turn, wore down the joystick even faster. The only joystick that I can think of with such a huge failure rate is the Atari 5200’s. What’s strange is that during the time of the N64, Sega Saturn’s “3D” joystick was a pretty good item. Maybe Nintendo was afraid of seeming too much like Sega. For whatever reason they chose the design they did, we know the end of the story: joystick failure.

Nintendo’s Joystick Fix?

What was Nintendo’s solution to this issue? They issued controllers in every color under the sun. Heck, if kids got their parents to buy more controllers, then it would prolong the life of the joysticks that the kids already had. And of course, the argument could be made that there were great 4-players games for the N64. Thus, the additional purchases made sense. Or at least it made sense if you weren’t the fourth kid to show up for a session of Bond. Yup, being the last to arrive meant you got stuck with that horrid failure of a thumbstick that everyone else rejected.

Repair Ideas

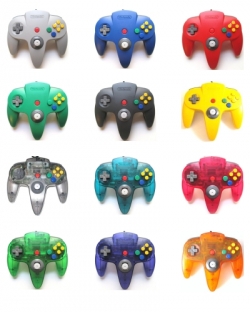
We kids were quick to learn to pull apart our controllers to swap the better joysticks into the cooler controllers. That’s why you’ll see so many mismatched controller casings. But this process of cannibalizing controllers certainly wasn’t a solution.

I fix up a ton of games and systems, but for the longest time I was stumped by the issue of Nintendo 64 joysticks. I watched a bunch of YouTube videos and scanned forums for repair tips. Some people suggested repairs using layers of Scotch tape. Others had complicated tricks for transplanting joysticks from other non-N64 controllers and then essentially hiring an electrical engineer buddy to make the two compatible. I’d even experimented with a process of resurfacing the worn parts with surfboard resin or clear fingernail polish, but neither of these seemed to work well.

Repair Solution

Finally, I found a good supplier for a quality joystick. We’ve started to carry that joystick, and I have to say that the case is now closed on the issue. The replacement joystick feels much more like the Game Cube or Dreamcast’s joysticks, and I honestly wish Nintendo had started with these in the first place.

The “how to” tutorial video below demonstrates the installation of these joysticks, and it’s pretty straight forward. All you need is a Philips-head screwdriver, about 5-10 minutes of time, and a little patience. No soldering is involved in this installation process, and once everything is unscrewed, you’ll literally unplug the old joystick and plug in the new one.

Feel free to contact us with any questions by commenting below or buy using our contact page.

Interested in purchasing a replacement N64 joystick? Check Amazon


Credits: Above photo “N64-Controller-Colors.jpg” used with permission of www.squidoo.com/controller-for-n64

Cleaning Games (Internal)

Game Cleaning Secrets Compared: Get Those Old Video Game Cartridges Working!

Perhaps you’re a retro video game hunter and collector. You find super rare game and get home only to find that game contains 20 years of dirt and corrosion on the contacts. Or maybe you’ve just realized that blowing in your NES carts doesn’t help but only makes you feel better…

While treasure hunting at one of my favorite pawn shops, I was talking with the owner who explained to me that for the past twenty years he’s been trading kids their dirty games for his cleaned ones. This guide covers some of the wisdom he shared with me and some other game cleaning tricks I’ve learned along the way. As always, proceed at your own risk and do your research and safe testing before trying to clean your rarer games.

OPENING GAMES

First off, it’s handy to be able to open the games. This generally isn’t 100% necessary, but it’s insanely helpful for those stubborn games. Additionally, it’s quite useful if you ever want to change your video game’s battery in order to regain saved game functionality. There are two main bits that you’ll want to pick up if you’re a collector. Both of these bits fit into your standard screwdriver handle. Additionally, both game opening security bits can be purchased at our eBay store.

3.8mm Game Security Bit allows you to open your Original 8-bit NES, SNES, and N64 video game cartridges. If’ you’re an old school Nintendo game collector like me, this is a must have.

4.5mm Game Security Bit allows you to open your Super Nintendo, Nintendo 64, and Game Cube consoles. Additionally, it’ll allow you to open your Sega console and Sega Genesis & Mega Drive game cartridges.


WET CLEANING METHODS

Whether or not you decide to open your games, you’re going to have two best friends. The first is a good brand of Q-tips. I personally will only use name brand Q-tips, because every cheap brand I’ve tried have too weak of necks. With any of these cleaners, I lightly moisten a Q-tip and, being careful to make sure the cleaner doesn’t run onto the circuit board, I give the game’s contacts a good scrubbing. Using the dry end of the Q-tip, I dry the contacts and repeat this process a couple times until I’m happy with the cleanliness of the contacts.

I’ve ranked mine cleaning solutions based on personal preference. (Remember to read the safety precautions on any cleaner before using it.)

My 1st Favorite: WD-40 Let’s face it, what can’t WD-40 do?! I love this stuff. I spray a little into the cap of the WD-40 can, lightly moisten a Q-tip, rub the contacts, and magic happens. Using this method, I’ve been able to clean all but a few of the most stubborn video game cartridges.

My 2nd Favorite: Electrical Contact Cleaner You’ve probably walked past it a hundred times without noticing it at your local Radio Shack or other electronic store. It turns out this is some pretty good stuff. Like WD-40 it’s quite effective at cleaning contacts. Unfortunately, I found the brand I bought to have stronger fumes, so my preference is for the WD-40.

My 3rd Favorite: Rubbing Alcohol If you didn’t know already, Isopropyl Rubbing Alcohol is magic for taking marker off the plastic of video game cartridges. Be careful though, because it’ll take the ink off your label just as effectively. Just like the previous two cleaners, I’ve commonly used rubbing alcohol to clean the contacts of video games. I haven’t found it to be quite as effective as WD-40, but it does a pretty good job. Plus it’s cheap and probably already in your medicine cabinet.

My 4th Favorite: Copper/Brass Cleaner Now and then you’ll see people on eBay advertise their games as “polished.” Often, they say they have a “secret” method. Chances are it’s simply their favorite brand of brass or copper polish. The stuff does a fantastic job cleaning game contacts, but generally you’ll have to open the game to use this method. Thus, it’s quite a bit more labor intensive than other methods.

My 5th Favorite: Windex Some would argue that the Ammonia in Windex or other Window cleaners can damage your video games, so I’d stick with the other cleaners first. However, I believe Windex is magic for cleaning the outside of video games. Again, be careful around the label as it can remove ink. It seems to do an ok job of cleaning contacts.

DRY CLEANING METHODS

Naturally, using a dry cleaning method is a bit safer. Overall, I find it less effective though, unless I’m opening a game to manually scrape corrosion off of the game’s contacts.

Eraser: Another fellow retro gamer suggested using a Staedtler Mars Plastic Erasers. He’s had great success cleaning games with these, and they post a fairly low risk of harming your games. Great suggestion Rudy!

Metal on Metal Scraping: After opening the game, (This is where that 3.8 mm or 4.5 mm bit comes in.) I gently scrape stubborn corrosion off of the game’s contacts. My favorite way to do this is with the edge of my 3.8mm bit itself as it’s already in my hand. Otherwise, I’ve used the edge of a key, a paperclip, etc. Just be careful not to damage the contact itself.

Dry Q-tip: Simply rubbing a dry Q-tip over the game’s contacts is a quick and easy want to get off a lot of the grit and grime. Often this can be done without even opening the game.

Emery Board: Yes guys, men and women can benefit from a manicurist’s emery board. As it’s essentially sandpaper on a stick, when used gently, it can be used to remove stubborn corrosion.

Fiberglass Pen: A fellow collector friend of mine swears by fiberglass pens. He opens the game and cleans it without ever needing to use a solvent. He swears by it since many people use them to clean circuit boards, but it’s a bit too time intensive for my taste.

YOUR METHODS?

I hope this guide will give you some ideas for cleaning your cartridge based video game collection. If you have any cleaning tips or suggestions for this guide, just send me a message or post a comment below, and I’ll be happy to add them.

As with any guide, experiment and find out what works for you. Feel free to check out the Video Game Museum eBay store for rare vintage games and cartridge opening bits. Most of all, happy collecting and have fun!